• Click to view our Accessibility Policy and contact us with accessibility-related issues
  • Skip to Navigation
  • Skip to Content
  • Skip to Search
  • About Sensi
  • Sensi Legal
  • Press
  • Sensi Blog
  • Get Sensi
  • Sensi Smart Thermostat
  • Sensi Touch Smart Thermostat
  • Sensi Touch 2 Smart Thermostat
  • Sensi Lite smart thermostat
  • Sensi Room Sensors
  • Sensi Multiple Thermostat Manager
  • Get Support
  • Support
  • Contact Sensi
  • Sensi Warranty
  • Patents
  • Sitemap
  • Privacy Notice
  • Terms of Use
  • Cookies
  • Accessibility
  • Do Not Sell or Share My Personal Information

Engineered for Sustainability

© 2025 Copeland LP. All rights reserved.

Installation

Sensi Room Sensor Installation

See how easy it is to connect Sensi room sensors. Sensi room sensors are designed to remotely monitor temperature and humidity in different rooms when paired with a compatible Sensi smart thermostat.

Sensi room sensor Installation

See how easy it is to connect Sensi room sensors. Sensi room sensors are designed to remotely monitor temperature and humidity in different rooms when paired with a compatible Sensi smart thermostat.

Installation Guide

Find A Pro

Need additional help?

Please browse our entire library of installation articles for assistance.

LEARN MORESENSI MANUALS
Step 1: Add sensor to your thermostat
Step 2: Connect your sensors
Step 3: Name your sensors
Step 4: Place or mount your sensors
Step 5: Prioritize your sensors
Step 5 - Prioritize Sensor

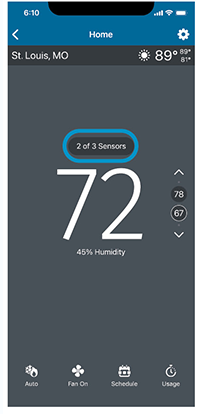
After installing your sensors, by default, there will be a checkmark next to all sensors and the thermostat in the mobile app. This means that your temperature settings will heat and cool to an average reading across all selected devices. To prioritize the temperature and humidity of a certain room or sensor, ensure only the sensors you want to prioritize are selected. 

The temperature and humidity shown on top of your app screen will display the average temperature across all selected devices in your home.

Step 3 - Name Sensor

In the Sensi app, tap on your Touch 2 thermostat. You will see your sensors above the room temperature. Tap Sensors to view your sensor status and rename them. 

Step 2 - Connect Sensor

Insert batteries into the sensor and tap OK on the Touch 2 screen. 

  • If the sensor already had batteries or was already paired, press and hold the Reset button located in the battery compartment for 5 seconds. 

Compatible sensors will appear on your Touch 2 screen. Tap Connect next to a sensor to pair it. It may take a minute to connect. If the connection is successful, you’ll see a green check mark. You will then be prompted to go into your Sensi app to rename the sensor. Pair one sensor at a time so you know which one you're setting up, if you have multiple sensors.  

Step 4 - Place Sensor

Place your sensors in their corresponding room locations. You can choose from several install options: 

  • Mount the wall on using the enclosed hardware 
  • Assemble the enclosed stand by sliding the sensor onto the base and snap into place 
  • Simply place the sensor on a flat surface such as a table or shelf
Step 1 - Add Sensor

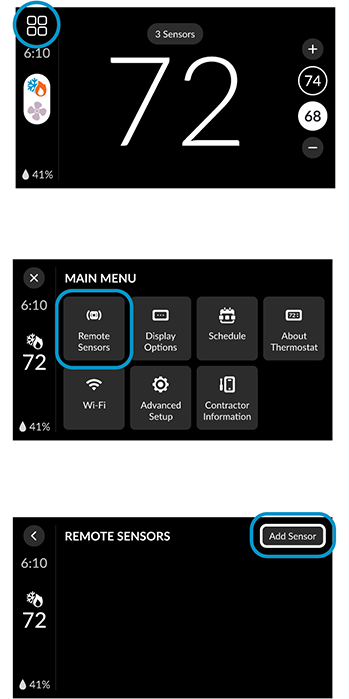
At the thermostat, tap on the menu icon in the top left corner. Tap on Remote Sensors. Then tap on Add Sensor in the top right corner.