Sensi Touch 2 smart thermostat
Our thoughtfully designed Sensi app guides you through the install process to get on the wall and connected in 30 minutes or less.
Sensi Touch 2 smart thermostat Installation
See how easy it is to install and connect a Sensi Touch 2 smart thermostat.
What else will you need for Installation?
- Medium-Tipped Phillips screwdriver
- Network name and password for your 2.4 GHz network
- Optional: Wire-cutter
Step 1: Add your thermostat to the Sensi App
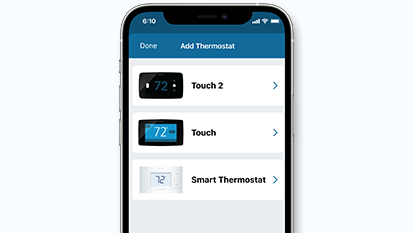
Once you have downloaded the Sensi app, and have created an account, you are ready to install the thermostat to your wall and connect it to Wi-Fi. If no thermostats are registered yet, tap the plus (+) sign to add a thermostat.
First, choose which thermostat you purchased. The Sensi Touch 2 smart thermostat option is for the following model numbers:
- 1F96U-42WF series
- ST76 series
Note: You can check your model number on the back of the thermostat cover.
Step 2: New installation or connect to Wi-Fi?
The app will ask you if this is a new installation or if you just need to connect to Wi-Fi.
If you answered “Connect to Wi-Fi,” please jump to Step 6 for instructions.
If you answered, “New Installation,” please continue to walk through the installation instructions.
Step 3: Remove old thermostat from wall
Turn off the power to your heating and air conditioning system before handling your thermostat wires.
Next, remove the old thermostat cover using a screwdriver, by pushing the pressure latch, or simply pulling the cover off. The Sensi app will prompt you to take a picture of your existing thermostat and old wiring in case you need it later. This can be helpful for troubleshooting with our technical support team if necessary. The picture you take will be saved to your camera roll or photo gallery.
Then, throw away any jumper wires. Sensi thermostats have a jumper wire built into them, and you will not need any jumper wires from your old unit.
Next, choose the terminal labels that have wires attached to them on your old thermostat. The app will tell you if you have a valid configuration. If you are getting an invalid configuration message, you can learn more about compatibility. Sensi Touch 2 smart thermostats require a c-wire.
After choosing the terminal labels, select what type of system you have, then label your wires. Using the provided wire label stickers, label your wires by removing one wire at a time. After all your wires are labeled, remove the old thermostat base from the wall.
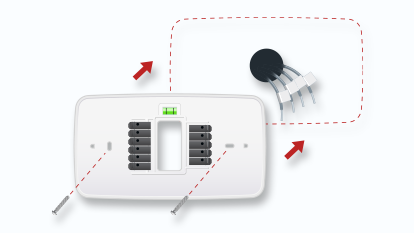
Step 4: Secure new thermostat base to wall
Use the provided mounting screws and secure the Sensi thermostat base to the wall.
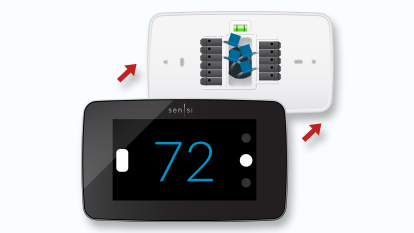
Step 5: Connect wiring and cover
Once the Sensi thermostat base is mounted and secured on the wall, insert the wires into the terminals. Simply push the wires into the terminal slots.
Next, push the thermostat cover onto the base.
Then, turn your power back on.
.
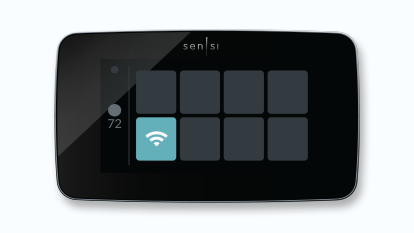
Step 6: Connecting to Wi-Fi and registering your thermostat
On the thermostat, press Menu, and then Wi-Fi.
In the app, scan the QR code on your Sensi Touch 2 screen. Bluetooth Technology will help you connect to Wi-Fi. This will require Bluetooth permissions on your phone. You can turn on Bluetooth in your phone’s settings.
If you’re having trouble scanning, tap “Use Security PIN” to manually enter the code on your touchscreen.
In the list of available networks, select your home Wi-Fi network and then enter your home Wi-Fi network password.
Sensi is only compatible with 2.4GHz networks.
Start Using Sensi
Congratulations on successfully installing your Sensi thermostat. Press “Start Using Sensi Thermostat” to open the main screen on the app.
Install your Sensors
*Based on survey results of 2120 respondents that purchased and installed a Sensi Touch smart thermostat in 2018, approximately 70% reported installing in 30 minutes or less. Adding a common wire may impact installation time.

Need additional help?
Please browse our entire library of installation articles for assistance.
